Free resources hosting with GitHub and CDN
I recently plan to start my first blog, but before that, I feel it's necessary to figure out one thing: image hosting. While i could just store my sources in local static assets, but this is obviously not a long-term solution.
So, i did some research and discovered a way to host images for free using Github and CDN.
jsdelivr - A One-Minute Solution
You may wonder: "Why not just put the resources to a github repo and use the raw links to get the images?"
That's right, but Github doesn't have the optimization capabilities for resources delivery. This means the delivery performance will depend on factors like geographical location or network issues, the loading process could be slow. There's why we come to CDN.
At first, i research which CDNs are free and found few well-known options, including Cloudflare, jsDelivr, Netlify etc. Then, i picked the two most famous one for testing: Cloudflare and jsDelivr
If you only looking for a simply way to host static resources with github, jsDelivr is by far the easiest and best option. You can get started in less than a minute and enjoy your first CDN experience!
Dont't believe me? Let me show you an example.
First, create a public GitHub repository. Lets call it blogImg. It’s important to emphasize that the repository must be public; otherwise, it won’t work. Next, upload an image (e.g., smile.png) to the repository. Finally, just open your browser and enter the URL in the following format:
Replace username, repository-name, and path-to-image.png with your actual values, and BONG! Achievement unlocked! 🎉
Cloudflare - Solution for Private Repositories
In general, i think you might prefer not to make your static resources publicly visible. With this in mind, jsDelivr is crossed out from my list, leaving Cloudflare as a viable alternative.
To use Cloundflare's services, you need an account. If you dont have an account yet, click here to register on the official site.
After successfully registering for cloudflare, go to the dashboard and find Workers & Pages option on the left sidebar, and then click on Overview.
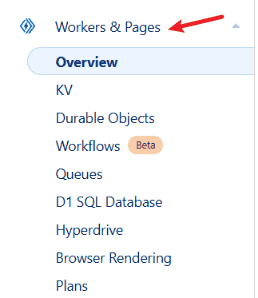
Next, click the create button on worker page. Cloudflare will provide several starter templates. By default, the template is a basic Hello World worker.
Note
On the creation page, you can only preview the worker code. The only editable field is the worker's domain.
For this tutorial, we use the Hello World starter template. Edit the default domain with one of your choice(optional). and then click Deploy.
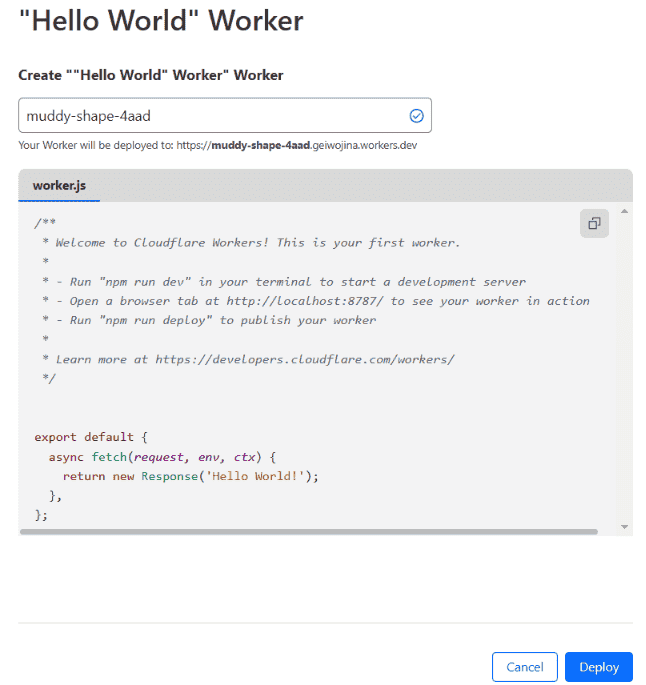
Once the worker is created, click on your newly created worker. Replace the default code by following scripts:
The principle of the script is very simple: reading image resources from a specified Github repository based on the URL path. However, you have to replace the Github related variables with your own values before deploy to your worker.
Let's temporarily pause Cloudflare aside and move on to Github. Before proceeding, ensure you meet the following prerequisites:
- A Github repository to store static resources.
- The repositoryis private.
The second condition isn't mandatory. However, as mentioning earlier, for public repositories, jsdelivr might be a simpler choice. Cloudflare is primarily a solution for private repositories.
Of course, if you insist on a public repository with Cloudflare, it is completely fine. You just need to make a slight adjustment to the worker code, which i wont go into details about this.
Back to main topic, if you want cloudflare to access your private repository, you need a Personal Access Token(PAT) from Github.
Generating a PAT
- Go to GitHub → Settings → Developer Settings → Personal Access Tokens.
- In the token generation interface, select the appropriate access scopes. For this setup, simply check the
reposcope.

Once the PAT is generated, copy the token value and head back to your Cloudflare worker. Replace the Github variables values with your PAT and other necessary values:
After replacing the corresponding variable values in the worker code, click Deploy. At this stage, your setup is complete, and you should be able to use the worker's domain to access the static resources stored in your GitHub repository.
For example, if your repository contains only one image (smile.png) and your worker domain is xxxx.workers.dev, you can access the image through xxxx.workers.dev/smile.png.
Changing the Worker’s Domain
The following tutorial requires a custom domain, which involves additional costs. If you’re looking for a completely free solution, you can stop here and continue using the default setup.
Cloudflare workers come with a default domain like xxxx.workers.dev. However, you can use your own domain to create a custom worker route.
First, navigate to the worker you created. In the worker dashboard, click the Settings tab. Under Domain & Route section, you can add your custom domain.
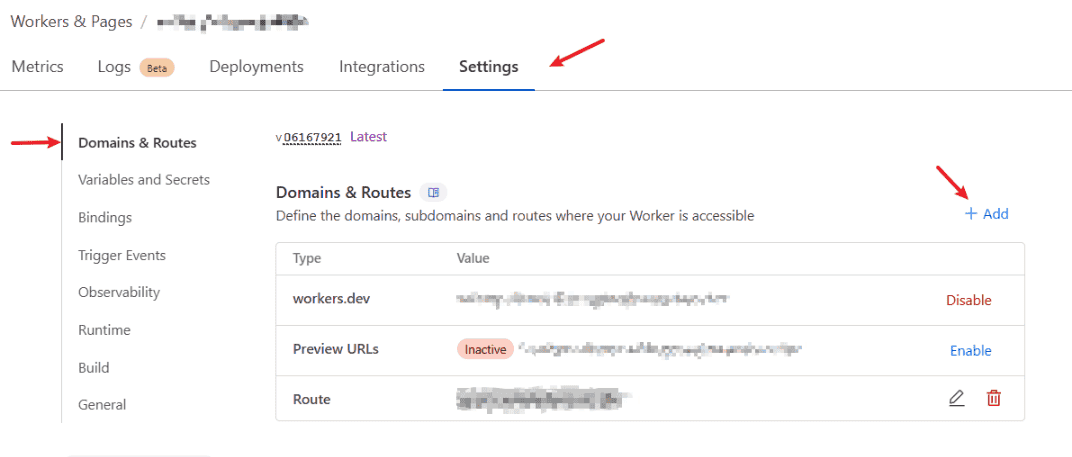
Click Add under the Domain & Route section, and you will see two options:
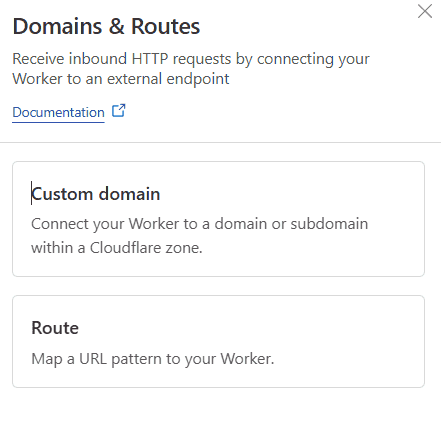
- Custom domain: Use this option if your domain is not hosted with Cloudflare.
- Route: Use this option if your domain is hosted with Cloudflare.
Choose the appropriate option base your situation, and input a route like yourdomainname.com/*.
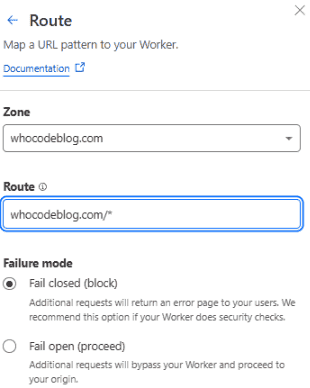
In my case, I prefer mapping the worker route to a subdomain, such as yoursubdomain.yourdomainname.com/*
Of course, to make the subdomain work, you must add a CNAME record in your domain's DNS settings:
Replace <worker-url> with the URL of your Cloudflare Worker (e.g., xxxx.workers.dev).
Once the DNS record and worker route is set up, test the domain accessible by accessing yoursubdomain.yourdomainname.com/smile.png.
Extra Notes
Cloudflare’s Limits
Excluding the domain-related aspects, Cloudflare Workers come with certain limitations, as shown below:
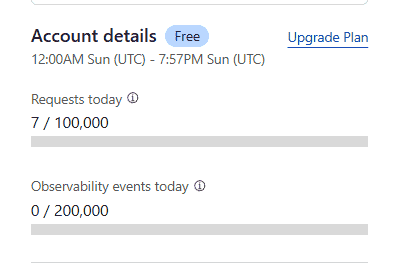
For most users, these limits should be more than sufficient. For example, 100,000 free requests per day is highly generous. For a blog-style website like mine, it’s virtually impossible to hit this limit in a single day.
SSL/TLS Settings
In my case, my project is hosted on Vercel, I purchased my domain from Hostinger, and then moved the domain hosting to Cloudflare.
If your configuration is similar, pay attention to the SSL/TLS settings. By default, the SSL/TLS encryption mode is set to Flexible, which may cause issues where the website fails to display correctly.
To fix this, change the encryption mode to Full. Note: Choose Full and not Full (Strict).
This may be just a problem I encountered. If your web page can be browsed normally, it is recommended to keep Cloudflare's default settings
Naming Images
After completing the setup, the next step is to consider a naming convention for your images. Try to imagine how much effort it takes to name each image.
A unique naming scheme can be easily implemented using various tools. One simple approach is to generate a unique identifier based on the current timestamp, such as 20241202040012027. This can be done from the command line.
For Linux or macOS Users:
For Windows Users:
This method ensures that each image has a unique and easy-to-track name without requiring manual intervention.
